Thursday, October 08, 2020
Wednesday, October 07, 2020
HTTP/1.1 500 Internal Server Error When Accessing Isabel4 (asterisk 16) Portal
This error is due to the permission, and it is fixed with command chown as below snapshots:
Error in /var/log/httpd/ssl_errror_log:
PHP Fatal error: Uncaught --> Smarty: unable to create directory /var/www/html/var/templates_c
#cd /var/www/html
#chown -R asterisk:asterisk var
#systemctl restart httpd


Thursday, June 18, 2020
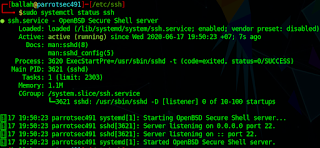
OpenSSH cannot be started: sshd: no hostkeys available -- exiting.
The error snapshot from /var/log/syslog:
From the line 7177, we notice an error saying that 'sshd: no hostkeys available -- exiting'
To fix such an error, the below steps are followed:
- To edit /etc/ssh/sshd_config, and configure the HostKey parameter as /etc/ssh/ssh_host_rsa_key:

- To generate the ssh key file ssh_host_rsa_key and store it under /etc/ssh:

- To start ssh daemon using systemctl:

- To check the ssh daemon status:


Saturday, April 04, 2020
checkmk Installation For Infrastructure & Application Monitoring on Ubuntu 18.04.4 LTS
Introduction to checkmk can be referred to this link.
Step 1: Dependency Installation:
It may vary depending on your system. You can observe the error message, if any, during installing checkmk using package manager dpkg:
sudo apt -y install dialog graphviz apache2 apache2-utils libevent-1.4-2 php-cli php-cgi php-gd
sudo apt -y install php-sqlite3 php-json php-pear pyro rpcbind xinetd freeradius-utils rpm lcab libfl2
Step 2: checkmk Installation:
Once the dependencies are successfully installed on Step 1, you can install checkmk with the below command:
sudo dpkg -i check-mk-enterprise-1.6.0p11.demo_0.bionic_amd64.deb
By default, your download location is located under your Downloads folder under your home directory ($HOME/Downloads). As of writing this post, I downloaded this package version check-mk-enterprise-1.6.0p11.
You will need to fix any error prior to continuing with the following steps:
sudo systemctl restart apache2
sudo omd create mysite
sudo omd start mysite
Please note that the default 'mysite' can be changed to any name you prefer. After 'sudo omd create mysite' you will be provided the generated password for the user cmkadmin as below snapshot as ab example:

You can modify the generated password by using the below command:
sudo passwd mysite
su - mysite
htpasswd -m ~/etc/htpasswd cmkadmin
sudo systemctl restart apache2
For the ease during my installation, I used password mysite for the user mysite, and password cmkadmin for the user cmkadmin. I don't encourage you to use such a very weak password in my case. It is strongly recommended, from the security point of view, to use strong alphanumeric mixed with special characters not-easy-to-guess password. Please follow recommendations from the security best practice.
Then go your browser, type http://localhost/mysite. After successfully login-ed, the web GUI will look like the below:

If you want to wipe all the existing configuration, you can use below command to reset:
sudo omd stop mysite
sudo omd disable mysite
sudo omd --force init mysite
After the last command, a new password for user cmkadmin will be regenerated.. Please find the sample snapshot below:

Credit: checkmk, installation log can be also found on this link, omd command reference.
Internet Experience Using Google Public DNS Servers
Few days ago, I personally encountered a problem of browsing my personal blog URL https://tballah.blogspot.com, the website was intermittently working (to get connected). I contacted my ISP support for help to resolve this issue. With onsite presence, an ISP technician found out, after several troubleshooting, that using Google public DNS servers can get rid of such a problem; I am still not convinced about this fix suggested by the technician. After working for some time, the problem returns back; I need to find out the reason why this phenomenon happens. You can refer to my packet capture for the DNS resolution and TCP 3-way handshake prior to send HTTP request; you can observe that DNS query can successfully be resolved, and also there are many SYN packets sent to the host tballah.blogspot.com, there is no any SYN-ACK returned back from the host. According to the traceroute result, the SYN packets could not be passed through to reach the final destination.


My workaround solution is to configure the blue line below in /etc/hosts file (Windows also has such a host file located under %SystemRoot%\System32\drivers\etc\hosts)
172.217.26.129 blogspot.l.googleusercontent.com
Also the hop 118.69.255.57 needs to investigate the root cause for the routing of IP 74.125.24.132, while IP address 74.125.24.191 for blogger.com can pass through this hop. The workaround is just computer-based fix not recommended i.e. other users of my ISP will have the same problem I faced.
However, and undoubtedly, there are some benefits of using Google DNS service which is free to use and can be used by anyone who has access to the Internet. You can use Google DNS IP addresses instead of your ISP’s DNS servers to improve the resolve time and provide security. You can set them either on the router DHCP sever configuration or statically configure them on your network interface card (NIC).

Recently I figure out the issue which is from the DNS query response from tested DNS server such as 1.1.1.1, 8.8.8.8, and 202.58.98.202. If the query responds with the IP 74.125.24.132 for tballah.blogspot.com whose canonical name (CNAME) is blogspot.l.googleusercontent.com, the TCP packet (SYN) cannot go through the hop 118.69.255.57. If the query result responds with the IP 172.217.26.129 or 172.217.31.225, https://tballah.blospot.com is working. Please check the screenshot of each DNS query for every DNS server below:

My workaround solution is to configure the blue line below in /etc/hosts file (Windows also has such a host file located under %SystemRoot%\System32\drivers\etc\hosts)
172.217.26.129 blogspot.l.googleusercontent.com
Also the hop 118.69.255.57 needs to investigate the root cause for the routing of IP 74.125.24.132, while IP address 74.125.24.191 for blogger.com can pass through this hop. The workaround is just computer-based fix not recommended i.e. other users of my ISP will have the same problem I faced.
Theses are the Google public primary, and secondary DNS servers:


Tuesday, March 31, 2020
Shotcut Installation Using snap on Ubuntu
Shotcut is a free, open source, cross-platform video editor. The below command is to install shotcut using snap:
sudo snap install shotcut --classic
sudo snap install shotcut --classic
Sunday, March 29, 2020
Materials and Cost Estimation For Recording Studio Setup
The attached PDF file is just a list (even not completed) of the materials required for a recording studio and its cost estimation as of March, 2020 based on price quoted from Amazon, and Cambodia local market.
How to Check What DNS Servers Currently Used In Ubuntu
I used to ask myself the same question on how to check what DNS servers are currently being used whether it is manually or dynamically (via DHCP) configured.
For manually configured DNS Server(s):
more /etc/resolv.conf
For manually or dynamically configured DNS Server(s) :
more /etc/resolv.conf
OR
systemd-resolve --status


Monday, March 23, 2020
Failed to install electerm using snap on Ubuntu
After I download the snap file "electerm-1.3.1-linux-amd64.snap" from this url, I get the following error shown in the snapshot below using command:
sudo snap install electerm-1.3.1-linux-amd64.snap

To fix such an error, the option --dangerous is used to force the command not to verify the installation signature:
sudo snap install --dangerous electerm-1.3.1-linux-amd64.snap
In summary, to resolve the error "cannot find signatures with metadata for snap" when installing using snap, you can use the flag --dangerous
Credits: Kyle, and electerm
***Note***: I encounter one problem; it is unable to use the command "sudo", and other commands as shown in below snapshot when using in electerm with error permission denied:

So I decide to uninstall with the following command:
sudo snap remove electerm
Once I download deb package from this link, I simply install it by the following command:
sudo dpkg -i electerm-1.3.4-linux-amd64.deb
Then the problem of "permission denied" is gone, and I can normally use all the commands:
As of March 24, 2020, the version electerm-1.3.4-linux-amd64.deb is available for download from this link
sudo snap install electerm-1.3.1-linux-amd64.snap
To fix such an error, the option --dangerous is used to force the command not to verify the installation signature:
sudo snap install --dangerous electerm-1.3.1-linux-amd64.snap
In summary, to resolve the error "cannot find signatures with metadata for snap" when installing using snap, you can use the flag --dangerous
Credits: Kyle, and electerm
***Note***: I encounter one problem; it is unable to use the command "sudo", and other commands as shown in below snapshot when using in electerm with error permission denied:

So I decide to uninstall with the following command:
sudo snap remove electerm
Once I download deb package from this link, I simply install it by the following command:
sudo dpkg -i electerm-1.3.4-linux-amd64.deb
Then the problem of "permission denied" is gone, and I can normally use all the commands:

As of March 24, 2020, the version electerm-1.3.4-linux-amd64.deb is available for download from this link
Friday, March 13, 2020
Openshot cannot be started in Ubuntu 18.04
After I install openshot via PPA, following from its official website:
sudo add-apt-repository ppa:openshot.developers/ppa
sudo apt-get update
sudo apt-get install openshot-qt
I cannot start openshot. After googling I found the solution by removing python3 module pyqt5 as follows:
$pip3 uninstall pyqt5
Credits: openshot, and github (Thanks to behnambm for the solution)
Saturday, February 15, 2020
How to install Khmer Unicode Fonts on Ubuntu 18.04.4 LTS
Font Download:
You can download the fonts from this link, and extract it to a folder.
Ubuntu 18.04.4 LTS Font Installation
You can install the downloaded fonts from the extracted folder by font-manager. If it has not been installed, please install it using below:
sudo apt-get install font-manager
Move your mouse pointer to the Activities corner at the top left of the screen to show the Activities Overview.
In Search Box Area, type Font Manager, then launch Font Manager application by clicking on it

Click on + button to add fonts by locating the location to where you extracted the fonts that you had downloaded.
Thursday, January 09, 2020
How to Change Default Network Name to old “eth0” on Ubuntu
Edit your /etc/default/grub changing the line from
GRUB_CMDLINE_LINUX=""
to
GRUB_CMDLINE_LINUX="net.ifnames=0 biosdevname=0"
and, finally:
$ sudo update-grub
and reboot your system:
$ sudo reboot
GRUB_CMDLINE_LINUX=""
to
GRUB_CMDLINE_LINUX="net.ifnames=0 biosdevname=0"
and, finally:
$ sudo update-grub
and reboot your system:
$ sudo reboot
Subscribe to:
Posts (Atom)